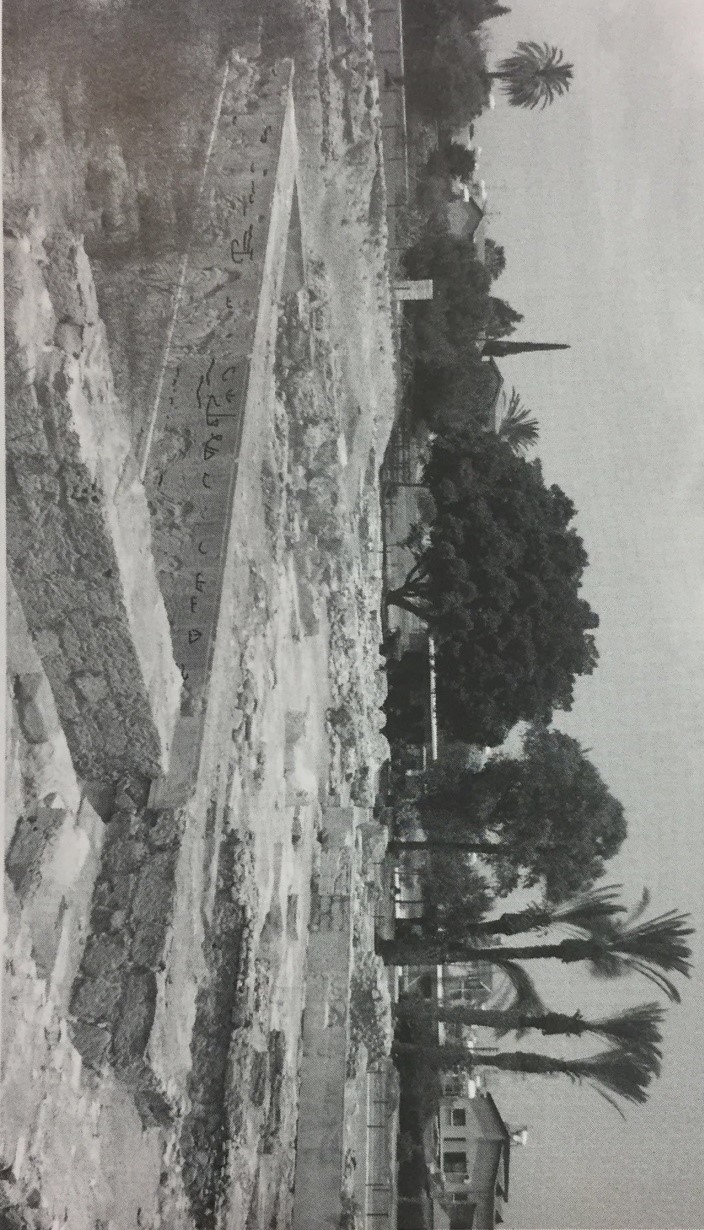
The earliest architectural remains from Area II
date to the LC IIC (1300-1190 B.C.), comprising two cult structures in
close proximity to each other, namely temples 2 (14.5 x 9 m) and 3 (6.75
x 4.15 m). After a brief period, a large-scale destruction of the site
initiated an impressive architectural program that completely rebuilt
the sacred precinct, now comprised of a vast sacred complex delimited by
the city rampart (LC IIIA, 12th century B.C.). During this
reorganization, temples 4 and 5 were added, while temple 3 gave way to a
vast open space (Temenos A). With the exception of the poorly preserved
temple 5, all buildings were built using ashlar masonry. This includes
the largest and most important structure of the precinct - temple 1 -
which was accessed through a monumental porch that opened to a large
court (Temenos B). Temple 1 was the focal point of the precinct, as
suggested by the exceptional architectural quality as well as its
commanding position vis à vis a metallurgical quarter (Northern
Workshop), to which it enjoyed direct access through a gate in its
northern wall. The building's size alone (35 x 22m) makes it one of the
largest monuments on the island known from this period. Temple 1
dominated the precinct not only in size and monumentality but also in
height, as it lies at the highest point of the bedrock in Area II. The
location of the city wall to the north and east as well as the workshops
on the west meant that the southern façade would have been the most
visible and thus the most important. The main internal approach to the
precinct was thus from the south toward temples 1 and 2. The excavators
stress that "the full effect of the massive ashlar orthostats of the
south wall of temple 1 cannot be fully appreciated at close quarters,
even standing at the southern edge of the street. A more distant
perspective is required; a fact which is not likely to have escaped the
notice of the temple architects who were quite clearly aware of the
public presentation of their building"(Karageorghis and Demas 1985: 90).
The monumental restructuring phase represented by Floor II was
eventually destroyed by an earthquake and flooding. In the original
publication of the site, the excavators argued that this was followed by
a brief rebuilding phase (Floor I, 1050-1000 BC), after which the temple
complex at Kathari was considered to have been abandoned for a
significant time of about a century and a half. A recent in-depth
re-examination by Smith however has shown that this gap in occupation in
fact did not occur, as evidenced by several contradictions in the
depositional, structural, and ceramic evidence. Smith notes that the
episode of destruction resulting in a layer of alluvium and sandy soil
above Floor I is similar to that observed after Floor II, with both
representing localized flooding rather than gradual silting up as would
be expected of an abandonment. She furthermore highlights that as with
the deposits following Floor II, the alluvial debris above Floor I do
not cover the entire site but instead are found primarily in the
northern part, just south of the city wall and temple 4. These deposits
are no deeper than the previous phase, which shows the destructions are
structurally similar and indicate episodes of periodic catastrophes
followed by clean-ups and rebuilding. This is indicated by the fact that
in areas farthest from the city wall and the source of the flooding, the
subsequent Floor 3 is not separated from Floor I but instead lies
directly on top of it. This was true for both flooding episodes, with
the depth of alluvial deposits decreasing with the distance from the
city wall. It thus appears that the intervening walls of Temple 1,
Temenos A and Temple 4 lessened the amount of wash reaching the
southernmost parts of the site. Nonetheless, the severity of the
flooding after Floor I seems to have been greater and damaged more of
the site probably due to the already weakened city wall from the
previous earthquake. This overall reconstruction of repeated earthquakes
and flooding is supported by recent corings from the harbour, which
indicate that the area was subjected to sudden changes caused by
tectonic uplift from the LBA onwards rather than a regular sea level
rise. Finally, Smith's re-examination of the pottery assemblage likewise
showed ceramic continuity from Floor I to 3.
The amended dating of Floor I has thus been changed to 1000-850 BC,
which significantly alters our understanding of the temple complex which
clearly remained in use throughout the EIA. During Floor I, the repairs
and alterations to Temple 1 were now made using sandstone rather than
the limestone from earlier periods. Unfortunately, pre-Floor 3 surfaces
inside temple 1 are missing, possibly due to flooding which may have
wiped out many of the earlier deposits. During this time, part of the
city wall was abandoned - in particular tower C, while other parts were
repaired. Changes were also made in the form of an opening for access
from the north, the effect of which was increased access to the harbour
area. Finally, the connection between the metal workshops to the north
and Temple 1 was closed off, blocking access to the north. This was
possibly a measure to prevent flooding. The western workshop area
meanwhile remained in use, but apparently ceased its previous production
of textiles, with the addition of a large oven signalling a new
industry. In the southeast, courtyard C was raised to cover one of the
older steps into the building. Temple 2's importance appears to have
diminished, but its design along with that of Temples 4 and 5, the
temenos areas and the courtyards retained the same overall arrangement
of the earlier period.
The biggest change however occurred in Temple 4, the interior of which
was considerably altered during this phase following significant
structural damage from the flooding episode. The raising of the floor
level first meant that much of the earlier features which had been part
of the Floors III-II were now covered. In their place, an impressive
built altar was placed near the centre of the main hall, comprised of
two elements of different construction and function: a hearth of
havara and mudbrick to the west, and a stone-built table of offerings
on the east. It appears that during Floor I, Temple 4 underwent
significant changes in its function. Smith has argued that during Floor
III-II, this building actually served as a workshop centered on the
collection of reusable raw materials such as metal and ivory, as well as
the crafts of furniture repair or carpentry. During Floor I, the space
was re-designed, with the hearth and altar arguing for a special cult
purpose. This is further indicated by the gaming stone placed on top of
the offering table and the ship graffiti prominently placed on the
supporting side slabs.
Following the flooding of Floor I, Floor 3 (850-707) saw substantial
changes during the clean-up process, including the workshops moving out
of the area entirely or just beyond the excavation limits. By this time,
the wall at Kathari goes out of use, with a ramp over the city-wall
added between temenos B and Temple 4 providing even greater access to
the harbour. This phase initiated a rebuilding of the temples, in
particular Temple 1 on a larger scale with an enlarged outside temenos
taking over the space originally occupied by Temple 2. This enlargement
indicates the aggrandizement of the temple, not its diminished
importance. On this floor, the orthostats were furthermore covered with
gypsum, indicating a greater attention to surface detail compared to
Floor I. Smith notes that although Temple 1's architecture saw
continuity in its ashlar form and position, its "purpose and design
changed remarkably" from Floor I to Floor 3 and Floor 2A. During Floor
3, a smaller version of Temple 5 was built over its predecessor, while
Temple 2 was no longer an enclosed structure and was incorporated into
temenos B.
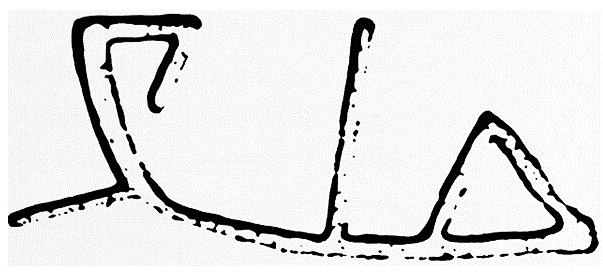
Graffiti contexts:
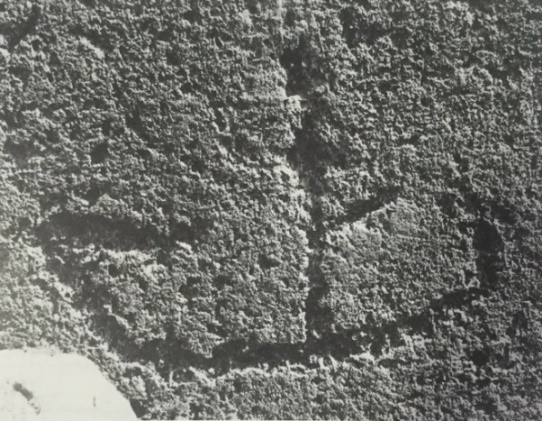
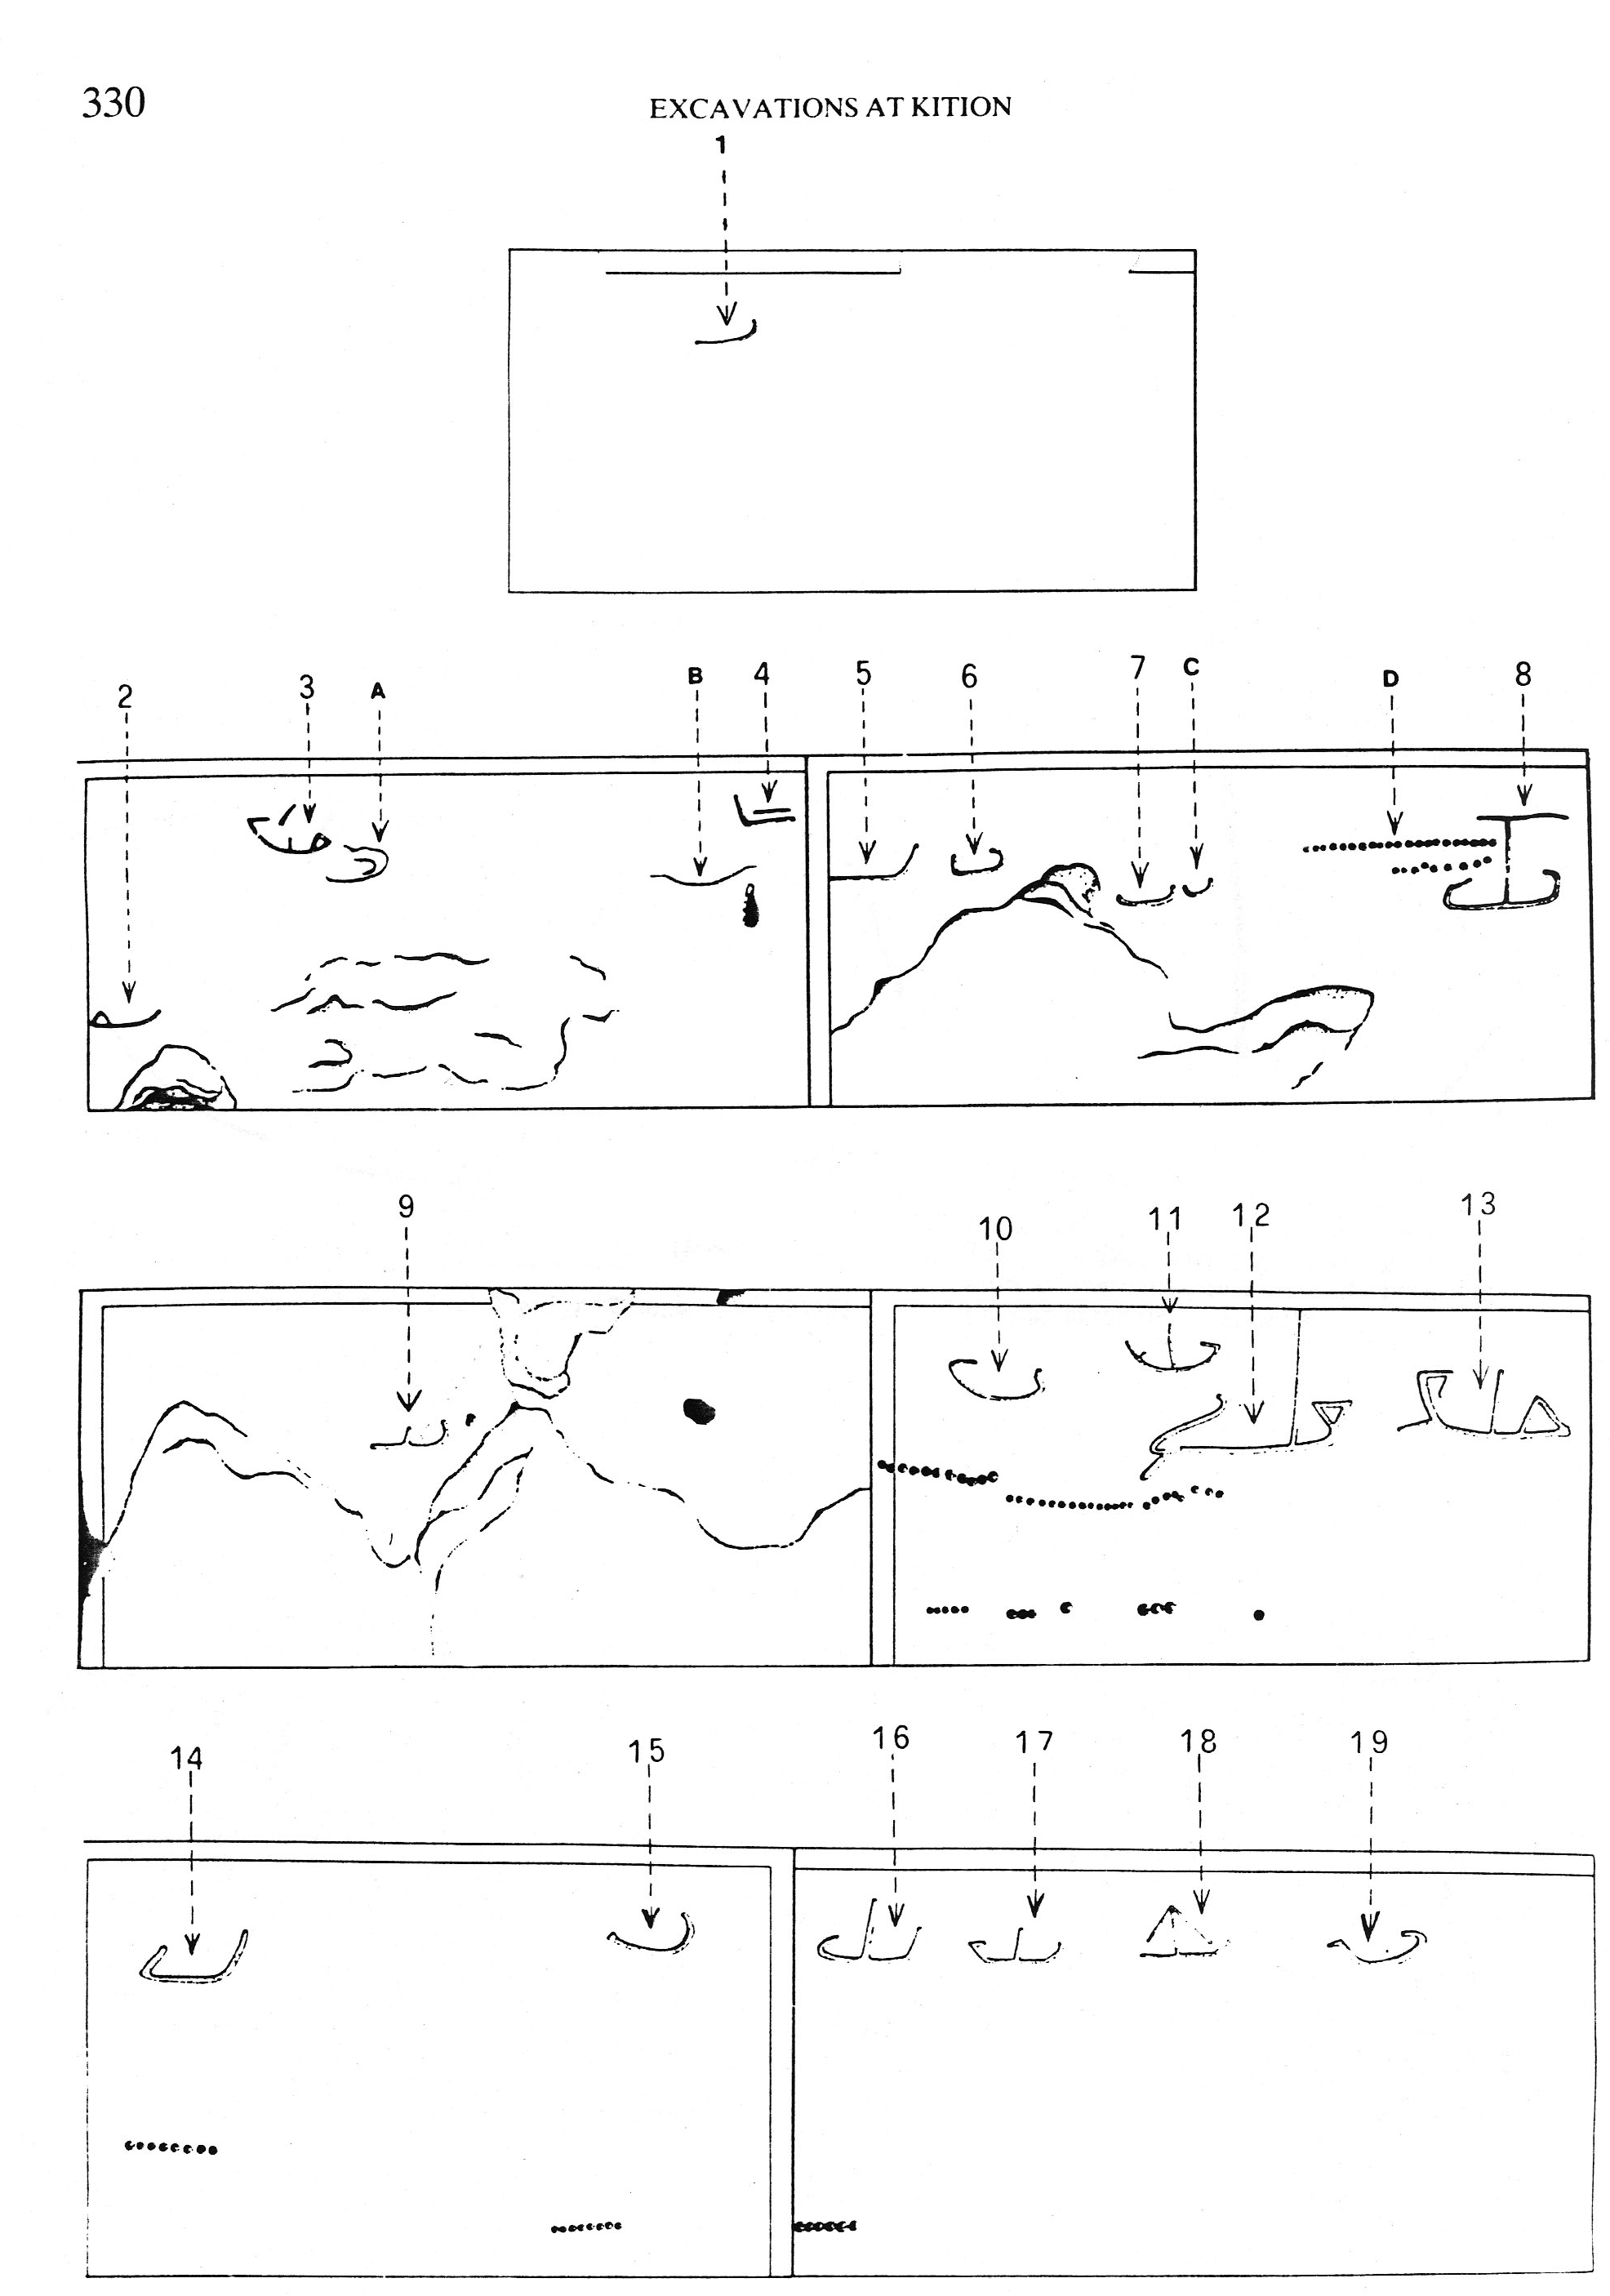
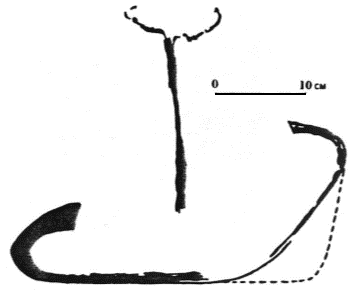
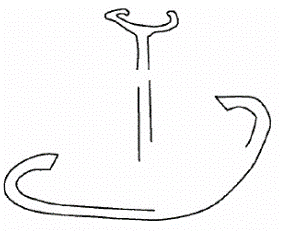
The ship graffiti are found in two clusters: 19 ships on the orthostats
of the southern wall of temple 1, and two ships (possibly a third) on
two vertical limestone slabs that compose the altar of temple 4. The
graffiti of temple 1 have a terminus post quem of c.1200 B.C. which
corresponds to the date of the wall's construction. Since the temple
complex remained in continuous use throughout the EIA, they do not have
a reliable terminus ante quem however. I disagree with Smith's
suggestion that the graffiti from temple 1 were added throughout the
entire history of use of the building from the 12th to the 6th
century. As Smith herself highlights, the purpose and design of the
complex saw remarkable changes ca. 850 and again ca. 707. This still
leaves Floor I which was in use for a considerable time. One way to
narrow down the chronological bracket is to consider the placement of
the graffiti from a visual and practical perspective. The orthostats of
the southern wall are 1.42-1.48 m high, with the ashlar footings below
them 0.35-0.5m height. The graffiti's location along the upper half of
the orthostats makes perfect sense if they were created more or less at
eye level, the most natural position for a person standing next to the
wall. This would also explain why whereas they generally cluster on that
level, there are some variations between individual graffiti, as one
would expect different individuals would vary in height. During Floor I,
the floor immediately in front of the southern wall (Courtyard C) was
raised, leaving only the upper two steps of the southeastern entrance
functional. Overall, the floor level in the temples was raised by as
much as 0.4 m, probably in response to the repeated flooding episodes.
Karageorghis notes that as a result of the higher floor level, the lower
part of the ashlar orthostats of the walls, at least for temple 2, were
no longer visible during this phase. In my opinion, this suggests that
the graffiti were most probably carved prior to the floor being raised
in court C, giving them a time range between 1200 and 1000 BC.
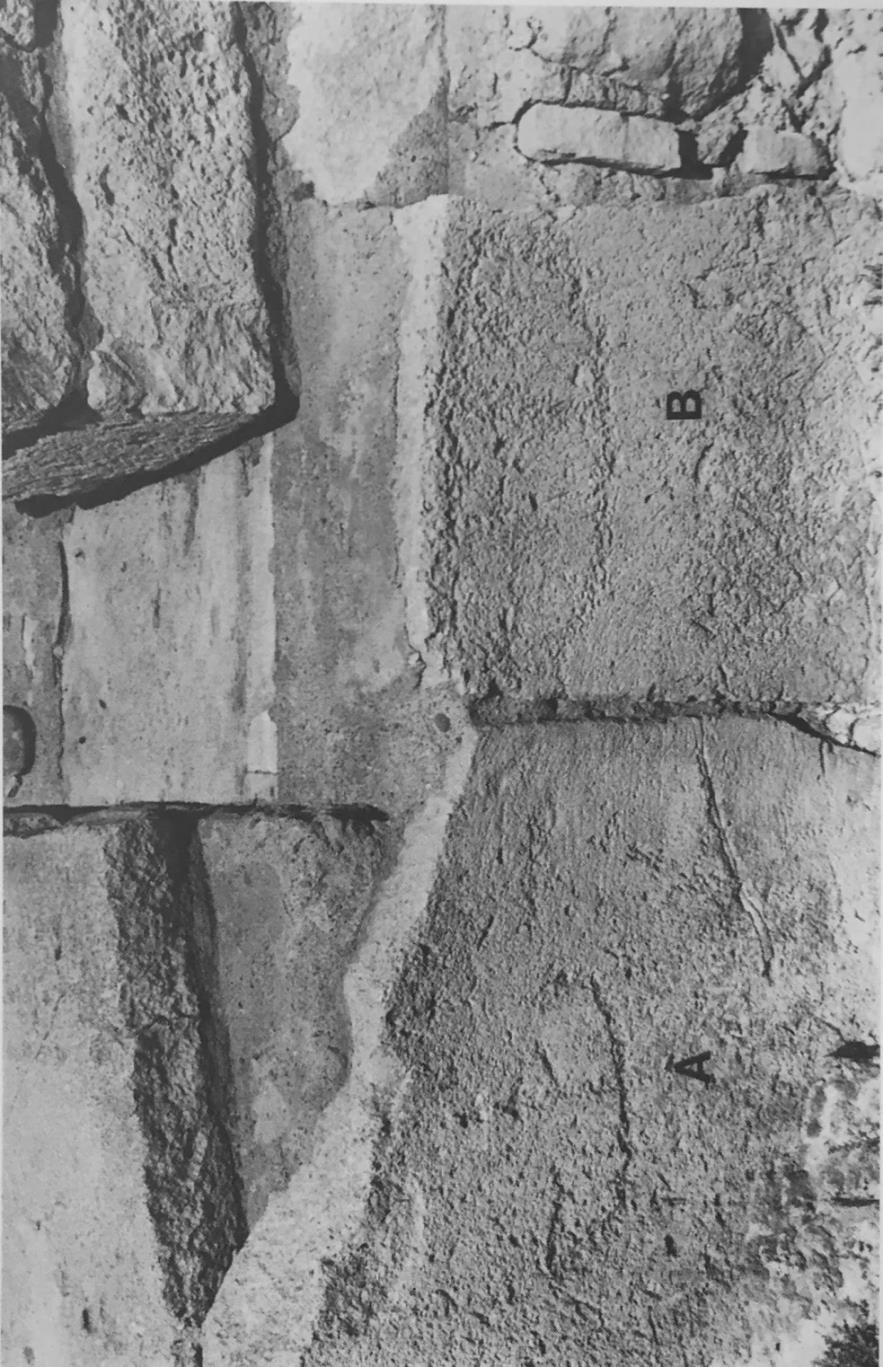
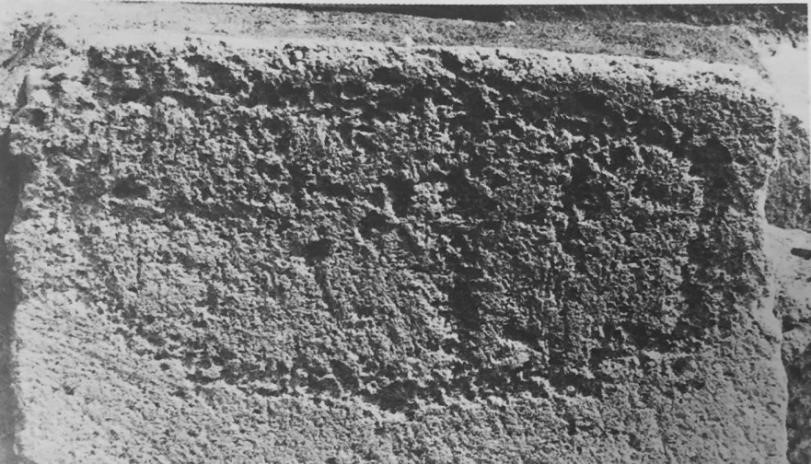
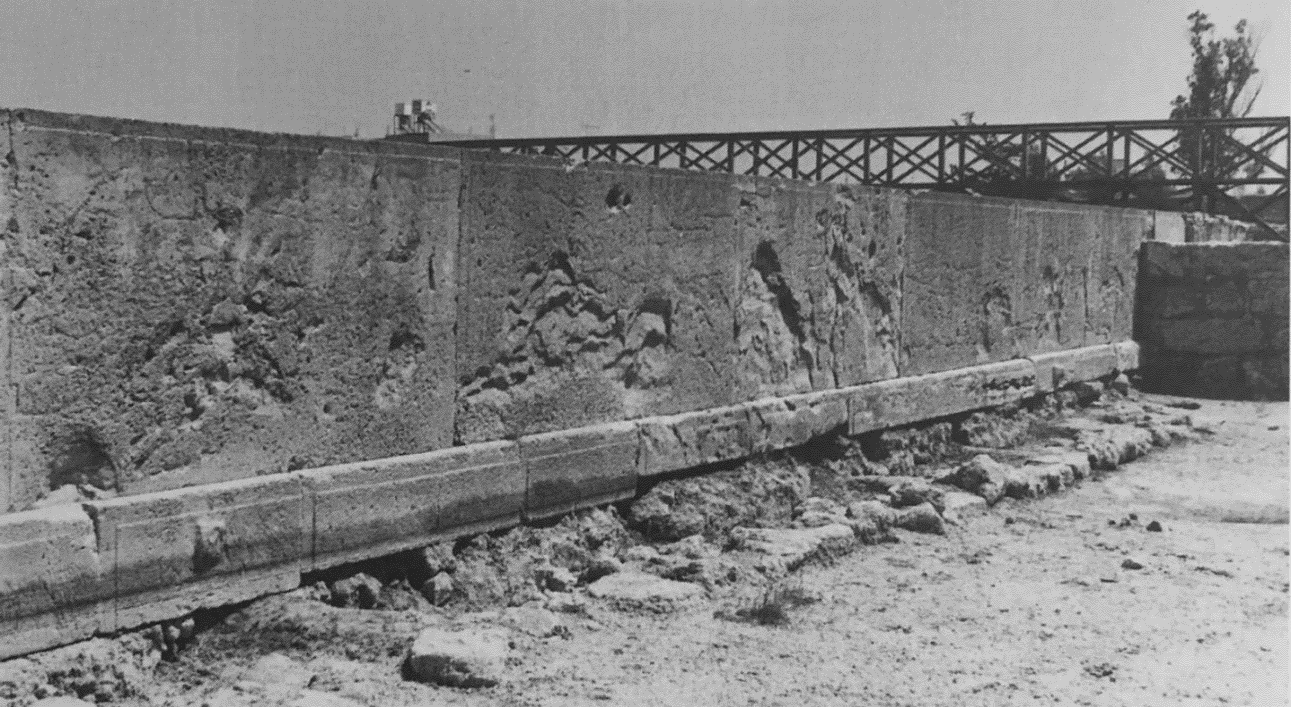
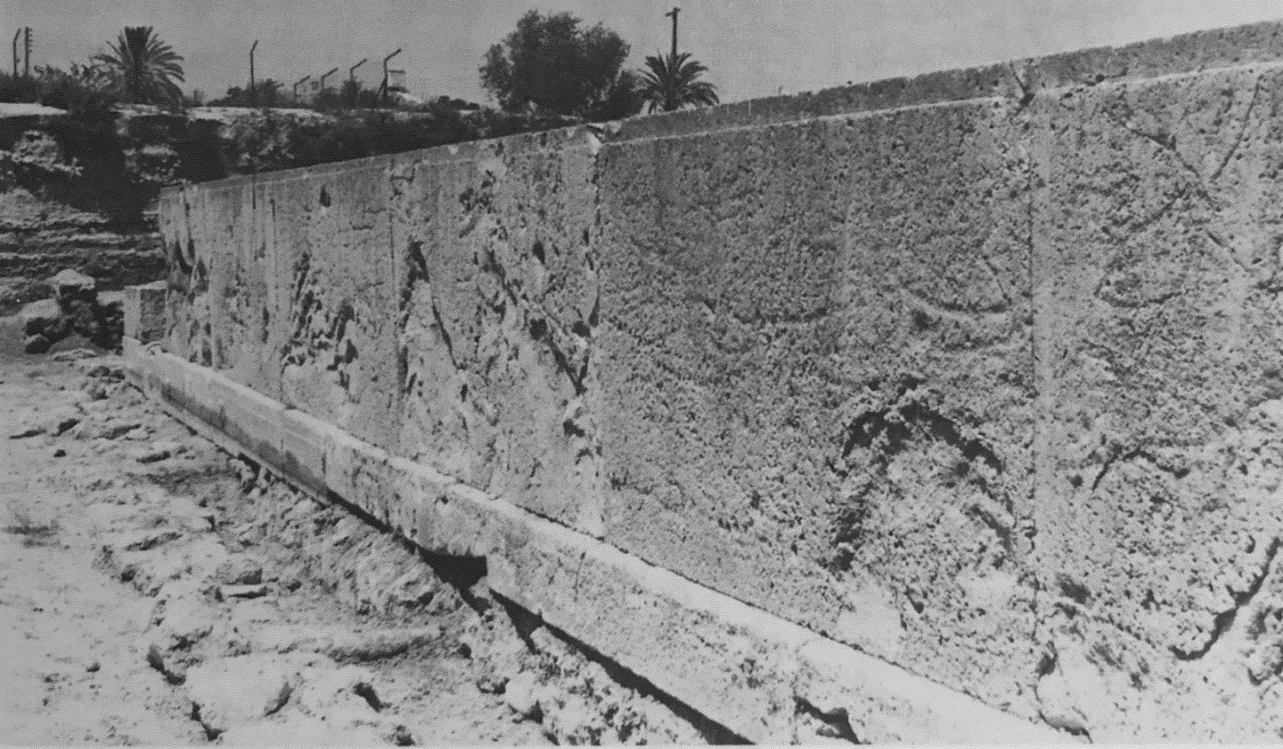
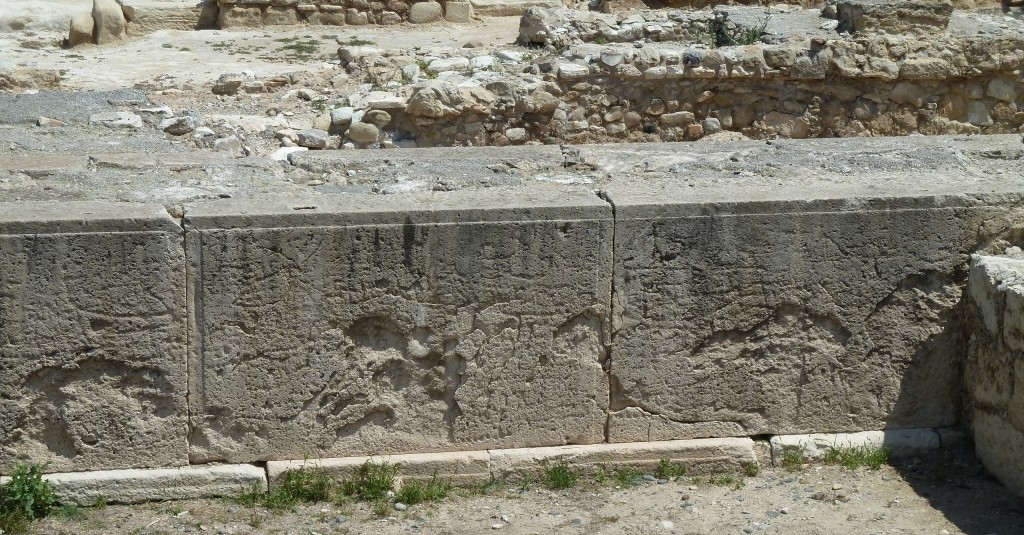
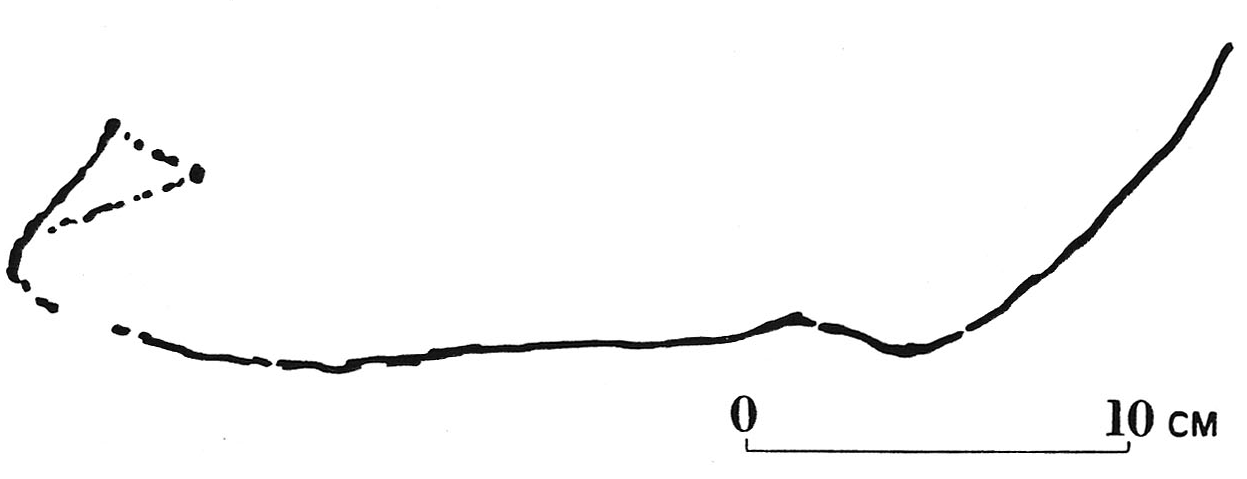
Given the prolonged exposure of the wall, these orthostats of temple 1
are quite weathered, with surface damage and grooves making the
interpretation of the graffiti difficult. Their fragmentary nature also
suggests that there were quite likely more ships than the 19 which were
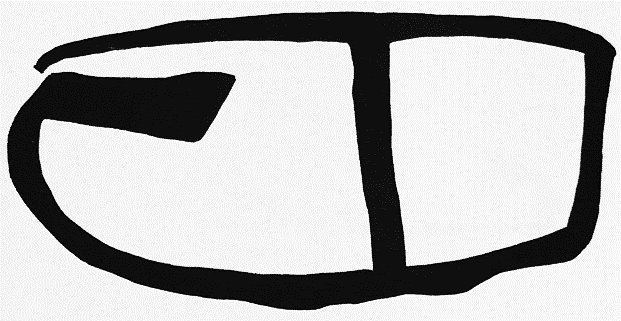
able to be recorded. Only four of these have been documented in greater
detail. The different techniques of engraving suggest that the graffiti
of temple 1 were executed by multiple hands. The suggestion that the
orthostats and graffiti were re-used from a previous context as
suggested by Le Bon should be rejected (Le Bon 1997: 90). The main reason is that
the use of ashlar masonry is a distinctive feature of the early 12th
century construction. More specifically, the orthostats on which the
graffiti are found are made of a reef limestone obtained from the
Koronia formation some 20 km away by sea, specifically selected for its
visually-striking whitish-color. Their procurement was thus clearly part
of the large-scale LC IIIA project. Finally, in the original report
drawing ship 5 was depicted as if it was only partially preserved at the
edge of an ashlar block, giving the impression that the orthostats had
therefore been re-used. A closer re-examination by Artzy and Basch
however revealed that the graffito was in fact complete, thus dispelling
this concern (Artzy and Basch 1984: 325).
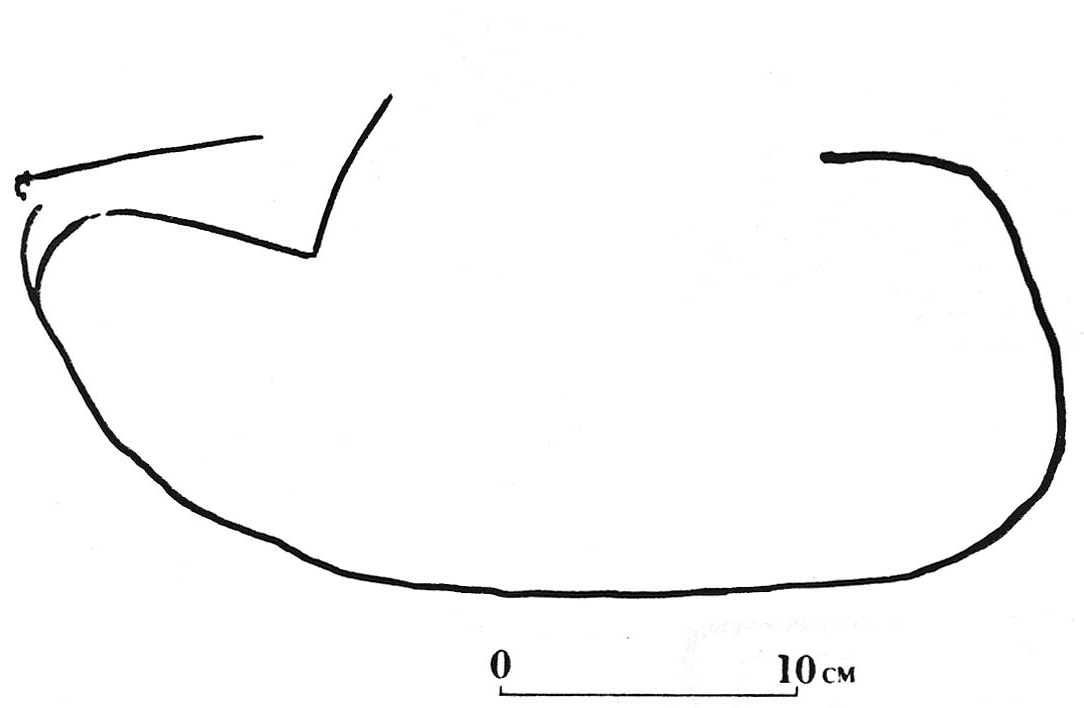
The altar of temple 4 was constructed for floor I (1000-850). The table
of offering was enclosed on four sides by single or double row of
vertically placed slabs. These cut through Floor II, with more than half
of the preserved height of the table lying below the level of Floor I.
The resulting height above the floor level was only 0.4-0.5 m. The ship
graffiti are located on slabs 4 and 5 and were only just visible above
the level of the floor, which gave them an appearance of floating at
sea. While the table of offerings remained visible in later periods, the
vertical stone slabs were only visible for this floor. The re-dating of
the floor however no longer gives a short chronological bracket for the
graffiti. There is no question that attention was given to the graffiti,
which were placed on a conspicuous location on the sides of the altar.
The presence of the gaming stone forming part of the surface of the
offering table might suggest some form of cult related to divination.
Smith notes that during Floor I, the main room may not have been roofed,
with the smoke rising probably visible from the harbour. Since the
gaming stone was itself potentially re-used, it is quite possible that
the slabs, including the ones bearing the ship graffiti were also in
their secondary use for the altar although they clearly continued to
have significance during this phase. I would argue that the creation of
the graffiti from temple 1 and 4 should be placed prior to Floor I. This
is based on the practical considerations outlined above, as well as the
fact that all other known graffiti cluster strictly within the last
phases of the LBA. Besides a similar cultic function, the typological
similarities between the Kition graffiti and the ones from Akko are very
hard to ignore. Furthermore, unlike Amathus and Salamis, Kition has
provided no ship imagery dating to the later parts of the EIA with the
exception of a single boat model. Taken together, it is thus quite
unlikely that the graffiti should be dated after ca. 1000 BC.