

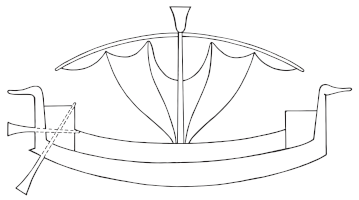
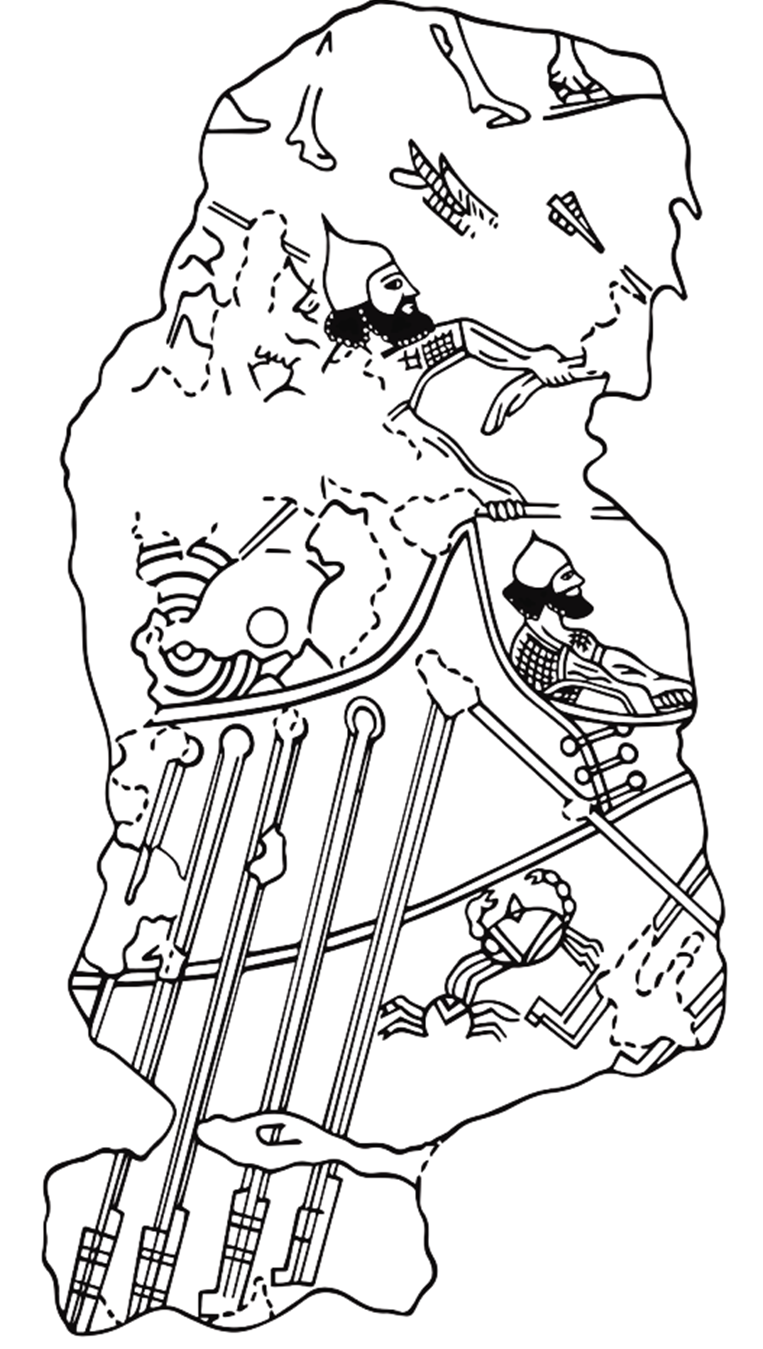
Fragmentary single-levelled war galley to the right, preserving only the bow section. Low flat hull with a massive triangular bow with a concave stempost integrating the bow projection. The bow projection has a metal sheathing denoted by a white colour against the red hull. Its beginning is demarcated by a black vertical outline at the base of the stempost. Three parallel horizontal rivets are painted in black across this line, attached on either side of it. The small, triangular-shaped forecastle is solid and integrated to the bow. There are five circular oarports immediately below the gunwale, with five oars with slender rectangular oar blades pointing in the direction of the stern. The oarports are barely larger in diameter to the oars themselves.
Naval battle
L32
Reign of Tiglath Pileser III (745-727 B.C.) or shortly after
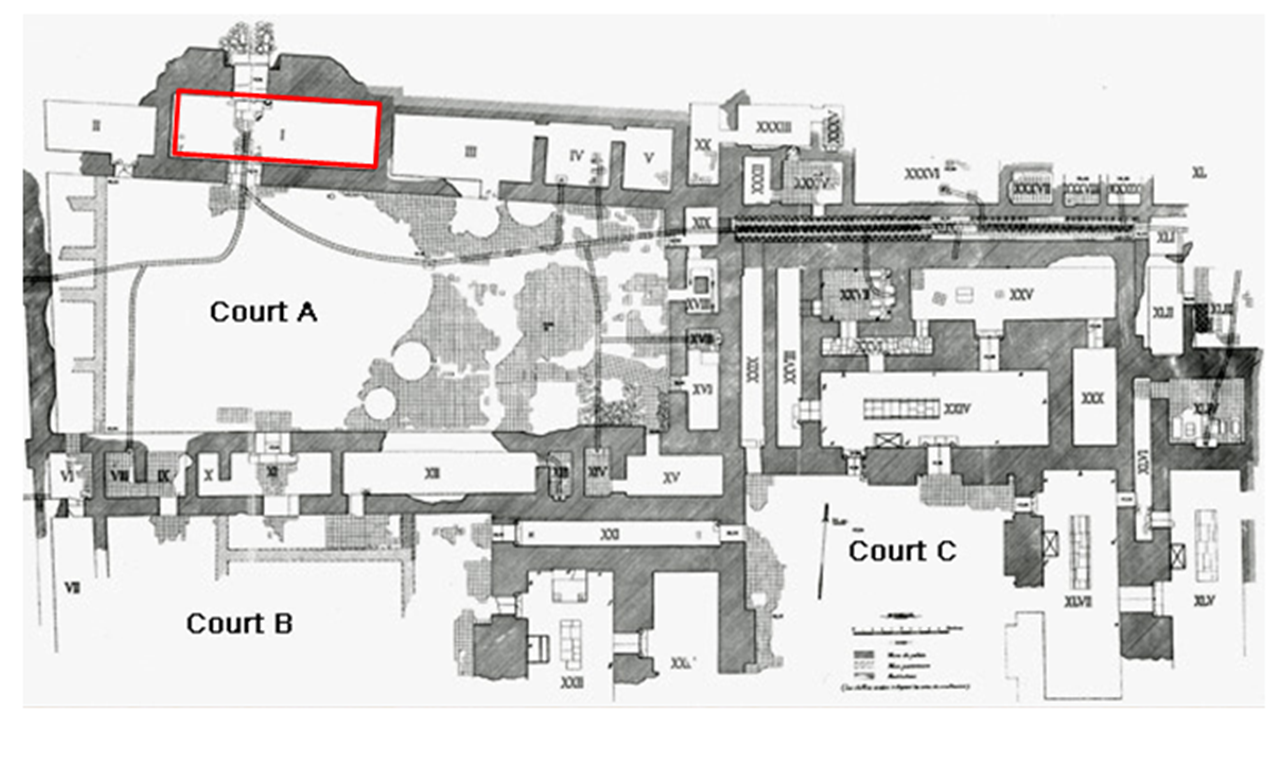
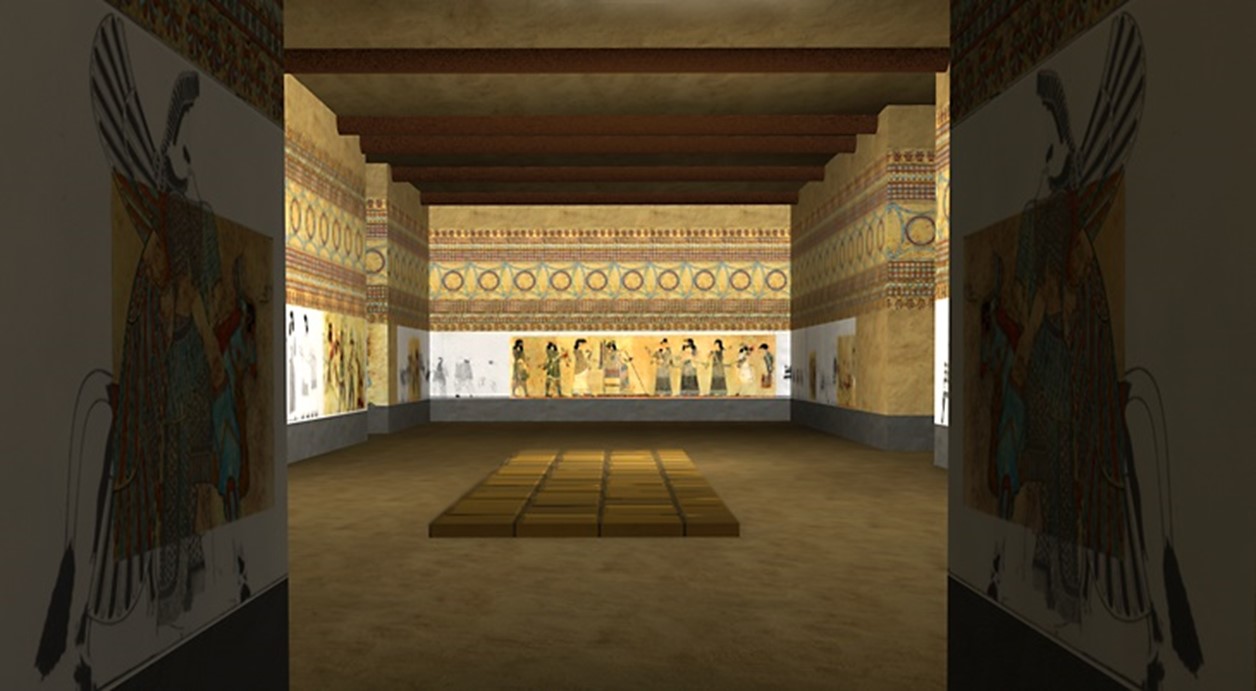
Til Barsip palace, Room I (vestibule) southern wall.
H: 74 cm; W: 42 cm
Polychromatic fresco
Aleppo Museum 251
Basch 1969: 143-144; 1987: 306, 308, no. 649; Bass 1972: 56, fig. 9; Hrouda 1965: 102; Mark 2008: 259-261, figs. 8-10; Orthmann 1975: pl. XXI; Strommenger 1962: pl. XXXIX; Thureau-Dangin and Dunand 1936: 10, 71, frontpiece; Tomabechi 1983/84: 66-68, fig. 1; Wedde 1996: 145, n. 90
Til Barsip was a Neo-Hittite city in north Syria in the area of the Aramaean-speaking Syro-Hittite state of Bît Adini. Known as Masuwari in Hittite, the city was first conquered by the Assyrians during the reign of Shalmaneser III in 856 B.C. after which it was renamed as Kar-Šulmānu-ašarēdu (Kar Shalmaneser), although both its original name and the Luwian language continued in use after that. Located on the left bank of the Euphrates, the city became a prominent Assyrian administrative center of the region due to its strategic location at a crossing of the river, and was eventually elevated to the status of the county seat of the province of Harran by Tiglath Pileser III. The city remained in Assyrian control until the late 7th century B.C. The Neo-Assyrian palace (130 x 100 m) was constructed with its edge facing the Euphrates. This strategic design made full use of the excellent view of the river, providing protection of its south flank all the while securing direct access to riverine transportation.
About fifty rooms of the palace have been excavated, including a third of the throne room and a significant portion of the central reception suites. The structure was comprised of three units each provided with its own court: Court A (forecourt) surrounded by domestic rooms; Court B (intermediary) providing access to the throne room (Room XXII); and court C (central or interior) connecting the throne room to two major reception suites (Rooms XXIV and XLVII). The building was constructed entirely of sun-dried bricks covered with a layer of greyish mud plaster 1-1.5 cm thick. The walls of the rooms around courts B and C were in addition coated with multiple layers of white lime. The base of the walls at the dado level was furthermore frequently coated in bitumen (0.2-0.5 cm thick) to a height of 40-60 cm. With the exception of Room I (vestibule), Room XIII (bathroom) and Room XV, the more humble rooms surrounding court A were not whitewashed or lined with bitumen.
Thirteen rooms have preserved traces of polychromatic wall paintings over the white lime coatings, most of which are not preserved. The colours attested include black, white, red, blue, pink (a mixture of red and white), purple (a mixture of red and blue), and dark purplish red (a mixture of red, blue, and black. The blue is an "Egyptian blue" made from a double silicate of calcium and copper, intended to imitate lapis lazuli. The outlines are drawn in carbon black of animal or vegetable origin, while the red is a natural ochre based on iron oxide.
The wall paintings belong to two groups separated by a time gap of at least one generation. The earlier group (Rooms XIV, XVI, XXIV and XXVI) is dated to the period of Tiglath Pileser III and Sargon II, likely somewhat closer to the latter. The later group's (Rooms XXII and XXVII) exact date is more difficult to determine, but is generally associated to the period between Sennacherib and Ashurbanipal. The types of helmets and shield of the naval scene from Room I are identical to those of Room XXIV and are therefore dated to the earlier period.
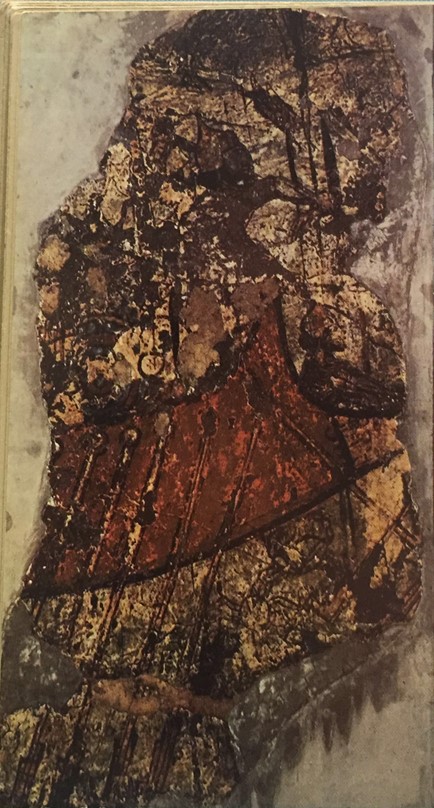
Room I (vestibule): There were remains of a frieze with lotuses, rosettes, circles and part of a bull found on the ground. The fragmentary wall painting bearing a naval combat scene was found against the southern wall. The colour of the paint has changed due to the heavy coat of varnish applied for preservation purposes. Elements that were originally white now appear yellow, while red ones are more orange and blue ones are more greenish. The fragment preserves the bow section of a single-levelled galley. One soldier is shown standing at the bow, tugging at the arm of a dead (?) human body with his left hand, while his right is pulling a rope. A second soldier's torso appears behind the bow projection, ostensibly having disembarked from the ship. His arms are also outstretched, and he appears to be pulling on something similarly to the other soldier. There are parts of two arrows visible in the background, one of them appears to have struck the person whose arm is being pulled. The hull is painted red, while the ram has a sheathing painted white. There is a shield at gunwale level with concentric blue, red, and white patterns. The skin and helmets of the soldiers are painted white, while their clothes are painted with red and blue checker-board pattern with white rims. The background colour of the water is blue. There are two crabs in the water and additional unidentifiable lines in the background. The line drawing of two concentric circles next to the shield is possibly the remnant of the preliminary drawing which preceded the final colouring of the fresco. The odd arrays of line drawings in the background water are possibly the painter's "scrawling" (nonsense free-hand drawings) which were expected to be hidden beneath the thick final coating of blue pigment. This theory is supported by similar attested scrawling in Room XXIV.
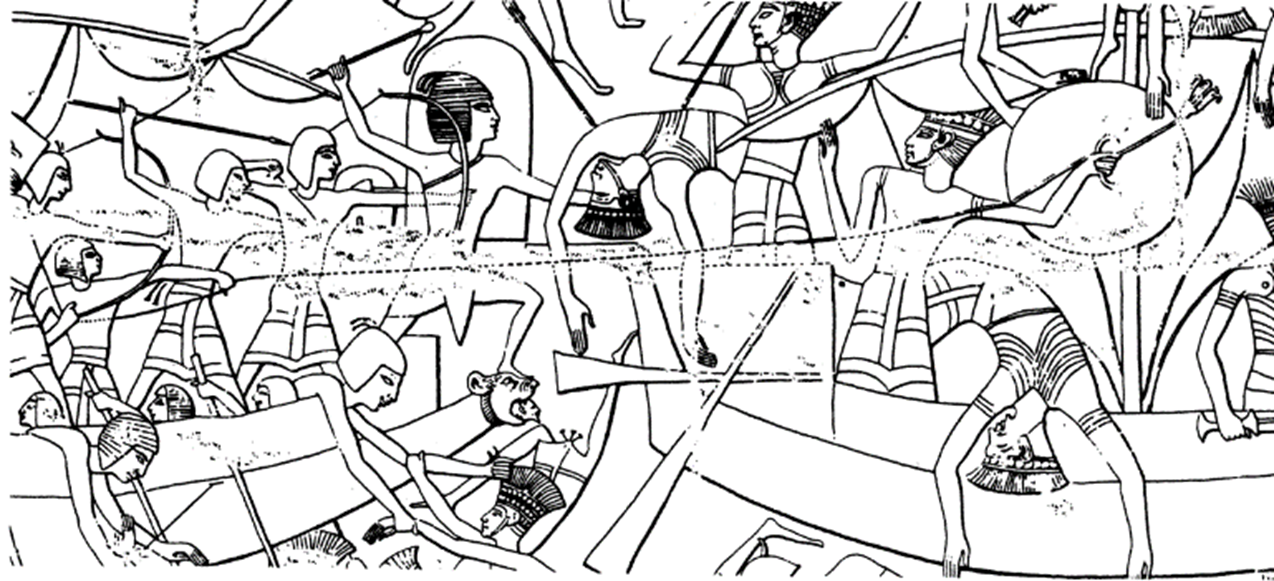
Naval combat tactics: There are several indications that the scene depicts ship-to-ship skirmishing and boarding, most probably in a river setting given the prominent location of Til Barsip and the position of the second soldier in the water behind the bow projection.1 The two different types of instruments known to have been used in such tactics are the grappling hook and the ship spear. Grappling hooks are shown being used on the Medinet Habu relief by the Egyptians to cause the Sea People ships to swamp. This was achieved by flinging the hooks into the rigging and the mast which was used as a leverage to tip the hull. The ship spear is known from the Akrotiri miniature fresco and from a number of Greek archaic imagery. Much as the confrontation shown at Medinet Habu, the attacking ship from the Til Barsip fresco appears to have used long range attacks first to disable the crews, with two arrowheads visible in the background. The soldier at the bow could be holding the rope of the grappling hook with his right hand. The other option is that since he is tugging at the lifeless arm of an opponent with his other hand, the object could instead be a ship spear lodged into the enemy's body. Given their length, ship spears would have normally required to be held using both hands, but it is possible that the soldier was able to pull it single handedly once the point had penetrated the opponent. The second soldier behind the bow projection is likewise pulling on something, this time using both hands. Given his placement, the likeliest option is the grappling hook, and his exposed forward position could imply that he was tasked with throwing the first hook. As for the problematic second line emerging from the foremost oar-port and running obliquely into the two oar blades of the opposing ship, it cannot be a ship spear since an oar is already in the oar-port. Its reading must remain purely conjectural, but it could either be the rope of a grappling hook which was passed through the oar-port to moor the opponent to the aggressor, or alternatively an anchor line. If the engagement is taking place in a riverine setting as is most likely, then the attacker could have pushed the opponent up against the river bank with the reinforced bow projection, using an anchor and grappling hook to remain stationary for the boarding operation.2 Mark similarly argues for a specialized tool used for ensnaring oars or hooking over the caprail (Mark 2008: 261).
1. An attempt at reading the various details of the scene has been made by Mark 2008: 259-261.
2. I am thankful to Michael Wedde for his useful comments regarding this scene (Wedde 2018, personal communication).
The hull is light and low, similar to the sleek Aegean
galleys of the Geometric period. The fact that the sheathing of the bow
projection is painted white just like the helmets of the warriors
confirms that it is metallic. It is clearly contrasted against the red
colour of the hull and oars, and is further delineated using an
additional dark coloured outline and rivets. Such a vertical demarcation
with attachments is also observable on the Sennacherib fresco.
The
shield was doubtless part of a series lined along the entire gunwale.
This appears to be a distinct feature of Phoenician ships, as it is
depicted not only on the Sennacherib fleet but also on much later coins
issued by the Phoenician cities of Sidon and Arwad.
This is the earliest
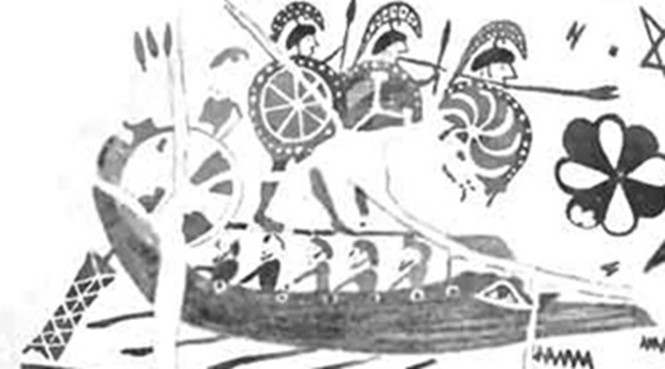
clear attestation of oar-ports. It is notable that one of the other
early examples from the Aristonothos krater, shows clear similarities.
There the circular oar-ports on the left ship are likewise placed
immediately below the gunwale. The bow, including the ram and the
forecastle are also similar, except that there is an additional occulus
which is lacking on the Til Barsip ship. Finally, the Aristonothos
vessel also has a shield, except that it is not part of a group and is
placed at the stern.
Tomabechi's claim that the fragment depicts the
stern of the ship because of the oddly placed additional line coming out
of the first oar-port which she erroneously reads as a second oar should
be rejected. Hrouda describes the scene as "a large war ship with a ram,
rowers and a sail." This sail however is not visible on the fragment.
Basch, L. 1969. “Phoenician Oared Ships,” MM 55: 139-162, 227-245.
―――. 1987. Le musée imaginaire de la marine antique. Athens: Institut Hellénique pour la preservation de la tradition nautique.
Bass, G.F. 1972. A History of Seafaring based on Underwater Archaeology. London: Thames and Hudson.
Hrouda, B. 1965. Die Kulturgeschichte des assyrischen Flachbildes. Bonn: Rudolf Habelt.
Mark, S. 2008. “The Earliest Naval Ram,” IJNA 37.2: 253–272.
Orthmann, W. 1975. Der alte Orient. Berlin: Propyläen.
Strommenger, E. 1962. Fünf Jahrtausende Mesopotamien: die Kunst von den Anfängen um 5000 v. Chr. bis zu Alexander dem Grossen. München: Hirmer.
Thureau-Dangin, F. and M. Dunand. 1936. Til-Barsib. Paris: P. Geuthner.
Tomabechi, Y. 1983/1984. “Wall Paintings from Til Barsip,” Archiv für Orientforschung 29/30: 63-74.
Wedde, M. 1996. “From Classification to Narrative: The contribution of Iconography towards writing a History of Early Aegean Shipbuilding,” MHR 11.2: 117-164.


 © drawing by T. Manolova

 © Thureau-Dangin and Dunand 1936
 ©
©
 ©
©
 © artefacts-berlin.de
 ©
©
 ©
©